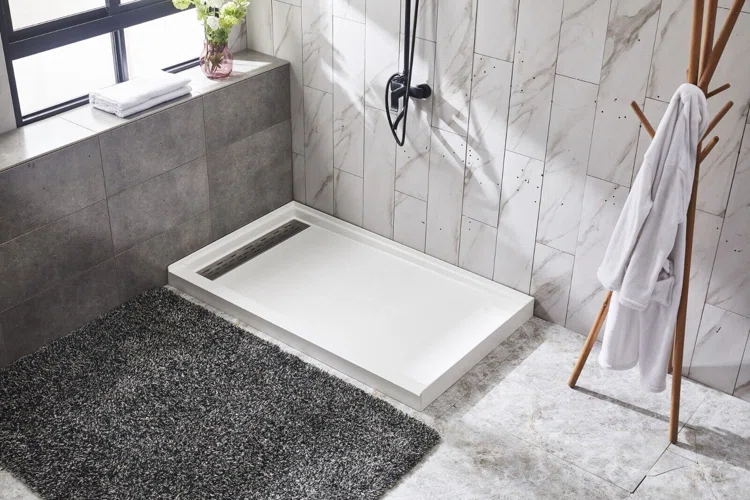
Installing a shower pan can feel like a manageable part of a bathroom renovation, but it's often more complex than it initially appears. The shower pan is the foundation of your shower system, responsible for directing water safely down the drain and protecting your home from costly water damage. Whether you're a seasoned DIYer or hiring a contractor, avoiding common shower pan installation mistakes is crucial. These errors can lead to leaks, mold, and structural damage, turning an otherwise successful renovation into a headache.
Let’s walk through the most frequent missteps people make during a shower pan installation—and how to avoid them.
Choosing the Wrong Shower Pan Material
One of the earliest—and most impactful—decisions is selecting the right material for your shower pan. This choice sets the tone for durability, maintenance, and comfort.
- Acrylic and fiberglass pans are lightweight and relatively affordable, but they may crack or flex over time.
- Tile-ready pans offer customization with tiles, but if improperly installed, they can be especially prone to leaks.
- Solid surface materials like cultured marble are stylish and durable but can be heavy and costlier.
The mistake lies in choosing aesthetics or cost over practicality. Always consider your household’s usage habits. A busy family bathroom might need a hard-wearing, low-maintenance option, while a guest bath could allow for more delicate materials. The right choice depends on the balance between function and visual appeal.
If you’re planning a full bathroom renovation, you might also find this helpful: How Much to Renovate a Bathroom
Ignoring the Subfloor Condition
Before setting the shower pan, the subfloor must be solid, level, and completely dry. This is a critical step that often gets bypassed in the rush to make progress. A warped or rotting subfloor won’t properly support the pan, and that compromises everything above it.
Over time, moisture seepage can weaken the subfloor underneath, particularly in older homes. Inspect thoroughly:
- Look for dark spots, mushy areas, or strange odors
- Repair or replace damaged wood
- Make sure the surface is flat and doesn’t slope
Failing to reinforce or repair the subfloor means risking instability and potential future water damage. No matter how beautiful your shower finishes are, they won’t last if they’re sitting on a weak foundation.
Skipping or Misapplying the Waterproof Membrane
The waterproof membrane is non-negotiable. Think of it as your last defense between a relaxing shower and a flooded basement. Many DIYers skip this step, rely entirely on sealants, or apply it improperly.
Shower pans installed without an effective waterproof barrier are among the top sources of hidden mold and mildew growth in homes. Even prefabricated pans benefit from extra waterproofing between the pan and surrounding walls.
Proper membrane application includes:
- Folding corners without cutting the material
- Sealing edges and seams thoroughly
- Extending the membrane several inches up the wall
In a tiled shower, this layer becomes even more essential. Grout and tile are not inherently waterproof. The membrane underneath does the heavy lifting—and when it's installed poorly, it leaves your home vulnerable.
Incorrect Drain Positioning
While it might seem like a matter of aesthetics or layout, the placement of the shower drain is both a structural and functional decision. Misaligning the drain results in pooling water, slow drainage, or an impossible installation.
Double-check measurements:
- Ensure the pan drain hole aligns exactly with the plumbing underneath
- Don’t rely on "wiggle room"—precision is essential
- Take slope and gradient into account to avoid puddling
Additionally, if your shower pan is tiled, the slope should be consistent (usually 1/4 inch per foot) toward the drain. One flat corner can slowly cause pooling and soap scum buildup.
Using Improper Sealants or Adhesives
Not all adhesives and caulks are suitable for wet environments. Selecting the wrong type of sealant can result in failure at the seams or corners—even within weeks of the install.
Use products labeled for "bathroom" or "wet location" use, such as:
- 100% silicone caulk for sealing edges and joints
- Thinset mortar graded for wet environments when installing tile pans
- Construction adhesive rated for shower pan installation, when applicable
Many homeowners mistakenly use latex caulk or general-purpose glue, which can degrade quickly in humid surroundings. Water will make its way into every uncertain seam, especially along wall intersections and around the drain.
For a visually cleaner and longer-lasting effect, smooth out any excess sealant with a gloved finger or caulk tool. This not only improves performance but also prevents unsightly clumping and buildups.
Thinking about how the space will look combined with practical finishes? Explore Bathroom Tile Ideas That Make Small Spaces Shine
Misaligning the Shower Pan
A tilted or misaligned pan is more than just visually jarring—it’s a guarantee of drainage issues down the line. Improper slope, gaps between the pan and wall, or uneven seating on the subfloor can all lead to water collection, cracking, or squeaking noises.
A correctly placed shower pan should:
- Sit level on all sides
- Slope gently toward the drain
- Be flush with the surrounding floor and walls
To help with this, dry-fit the pan first. Drop it into place without adhesive, making note of any adjustments required. Use a level across the surface and shim if necessary.
Once you’ve applied the adhesive or mortar, you usually get one shot at alignment. So preparation here is everything.
Failing to Test for Leaks
This oversight is surprisingly common. After spending time installing the shower pan and sealing everything up, many folks move on to tiling or framing without confirming the integrity of their work.
However, a simple leak test could save you from weeks—or years—of hidden trouble.
Perform a standard flood test:
- Plug the drain and fill the base with water up to the threshold.
- Leave it filled for 24 hours.
- Observe any drops in water level or signs of escape.
This step might cost you a day of progress, but it's nothing compared to tearing down finished walls to fix a leak. Better to spot the flaw early—and fix it while it's accessible.
Overlooking Expansion Gaps
Like any building material, shower pans can expand or contract slightly with temperature and moisture changes. Installing the pan too snugly against walls or tiles can prevent it from shifting naturally, leading to cracks or buckling over time.
Ensure you leave a small expansion gap—typically 1/8 inch to 1/4 inch—around the edges where the pan meets the wall. This space can be filled later with flexible, mold-resistant caulk to prevent water intrusion.
This small step accommodates movement while still sealing out moisture, giving your shower build the flexibility it needs over time.
Rushing the Job
Finally, patience is one of the most valuable tools in any home improvement project. One of the most consistent mistakes is rushing through a shower pan installation to move onto more visible areas, like tiling or fixtures.
But a rushed pan install often results in missed measurements, skipped steps, or improper curing of adhesives. This is one area where slow and steady wins the race—because repairing mistakes here almost always requires backtracking and redoing finished work.
Set aside adequate time, ask for help when needed, and triple-check your progress.
For other long-lasting design tips built on solid planning, consider our post on Microcement Trend for Modern Interiors, which reflects a careful, structured approach to modern bathroom design.
Final Thoughts
Avoiding common shower pan installation mistakes isn’t just about a checklist—it’s about protecting the heart of your living space. A well-installed shower pan reduces the risk of hidden leaks, structural damage, and future repairs. From properly preparing your subfloor to conducting thorough testing, every step counts.
If you're taking on a larger bathroom renovation project, scale your priorities with equal care across plumbing, surface design, and layout. Well-done showers are built on more than aesthetics—they’re about intelligent choices that preserve comfort, cleanliness, and calm.
Mistakes may be part of learning, but avoiding them in the first place? That’s smart homeownership.
You might also enjoy reading about how to Turn a House Into a Modern Victorian House—because proper groundwork, whether in old-home charm or shower builds, always pays off.